Showing posts with label Handmade Gifts. Show all posts

Tuesday, 21 March 2017

A Pretty Gift Idea...


 A few weeks ago we needed a special gift for a friend's daughter who recently got married...

Whilst looking around a couple home stores for a lovely gift, we came across a plain heart chalkboard and thought, "Ah!  We can spruce it up with some ribbon, lace and a little something or other!", which is precisely what we did...


I used some beautiful pink ribbon to hang the heart chalkboard up by and narrow pink lace to attach the chalk and chalkboard cloth to the actual board...


I whipped up a simple fabric flower and attached a pearl pin to the centre, securing the flower to the board with double-sided tape.  I used broad pink lace beneath the flower on the right-hand side of the board...

A simple, pretty gift ~ perfect as a small wedding or house-warming present...{{Smiles}}

 ~
I hope yours has been a truly happy week, dear friends...

With love,
Kelly-Anne

Wednesday, 1 February 2017

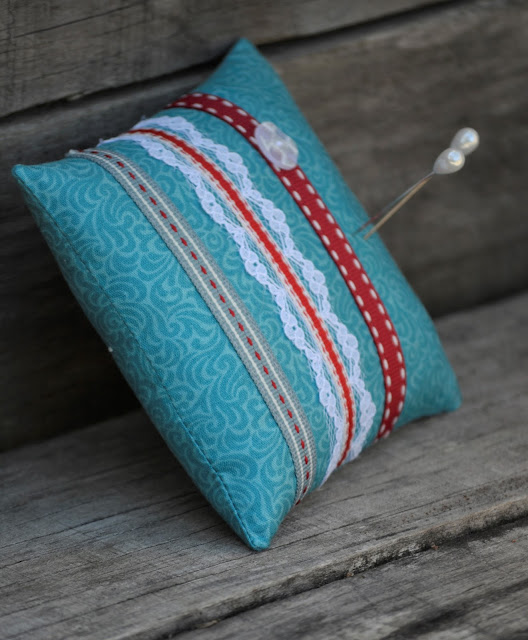
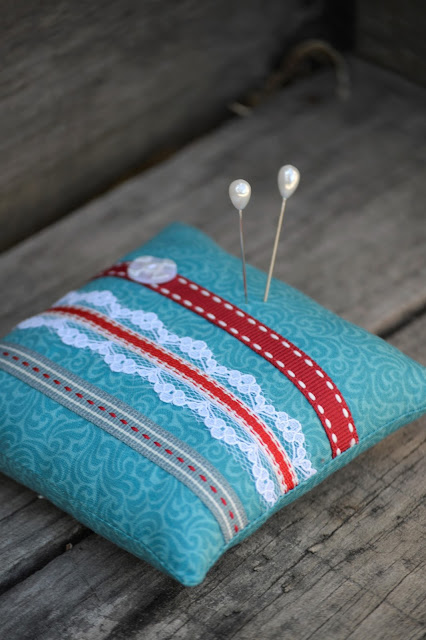
A Mini Pin Cushion Tutorial and New Items in the Shoppe!

https://www.etsy.com/listing/509195701/free-shipping-pin-cushion-turquoise-red?ref=shop_home_active_1
 The tutorial you have been awaiting is here, my dear readers!
Brew yourself a cup of tea, pull up a comfy chair and let us discuss one of the happiest of subjects…sewing. 
♥

What I love about these pin cushions is that they are elegant, practical and require very little effort indeed…
I would even recommend this project to a beginner…  

Oh and before I forget...I have decided to extend my special giveaway by another few days...it will end on February 6th.  
If you would like to join in the delights, please do visit my giveaway post here...♥

~
On to the tutorial…

Let us begin by selecting the fabric we wish to use.
I have used a plain design for this pin cushion...


Using a ruler and rotary cutter (a fabulous tool), cut two 5 inch by 5 inch squares of your fabric and lay aside.


Now look through your ribbon and lace collection and choose three or four pieces which coordinate nicely with your fabric.
Be creative – I like to sew narrow ribbon on the edge of my lace, but it is not necessary.

Cut ribbons and/or lace a little bigger than 5 inches.

  
Now pin the ribbon and/or lace in place. 
I like to measure and mark with a pen where each piece should go so as to ensure straight sewing. 

Now for the exciting bit… ♥


You may have to thread your machine several times – although it does take a little longer, matching up cotton to each length of ribbon and/or lace really creates a stunning effect which is pleasing to the eye.

Note:  I loosened the tension and increased the size of the stitches on my machine so that the ribbon and lace wouldn’t pull the fabric inwards.

 
 Once you have neatly stitched the ribbon and/or lace in place, use an iron to press flat on the wrong side of the fabric as you don’t want to melt the ribbon and/or lace…  I speak from experience here.  {{smiles}}


Place fabric squares right sides together and pin. 
Sew all the way around the square, leaving a small opening on one side so as to turn the cushion right way around.   
I used a ¼ inch seam allowance.

 
 Use a crochet hook, knitting needle or a blunt pair of scissors to press the corners of the pin cushion out. 

Use an iron to open and press the side seams being careful not to go over the ribbon.


Fill the pin cushion with stuffing. 
Sometimes I add a strongly scented teabag to give the pin cushion a delicious fruity flavour!  {{smiles}}
Once the pin cushion is filled evenly, sew the opening closed using mattress stitch.

 
You are almost done…♥
Now decide where a button or satin rose (or anything else that takes your fancy) should go to add the finishing touch to your little pin cushion!

https://www.etsy.com/listing/509195701/free-shipping-pin-cushion-turquoise-red?ref=shop_home_active_1

  …And there you are…a beautifully elegant pin cushion!

A charming gift for a friend who loves sewing or for yourself!  {{smiles}}
Did you spot my pin cushion in this tutorial?

https://www.etsy.com/listing/509195701/free-shipping-pin-cushion-turquoise-red?ref=shop_home_active_1

~
I have also restocked my little Etsy Shoppe with bookmarks and pin cushions, including this one and offering FREE SHIPPING worldwide on ALL items for a limited time only!  Stop be here...♥


 *Pins not included.

~
I hope the month of February is most beautiful one for you, sweet friends…
I am once again working in the garden alongside my little sisters, creating something of a paradise for us as we so love to sit outside with a cup tea and chat or browse through an inspirational magazine…

I’d simply love to hear how you get along with these pin cushions should you decide to make one…or two or more! 
Do drop me a line in the comment box or email me…

With love and joy,
Kelly-Anne

~
 Today I am sharing this sewing project with...

Tuesday, 17 January 2017

Charming Little Pincushions...♥

Hello dear readers...♥
I hope you have had a most beautiful and creative week thus far?
I have been sewing and sewing whilst listening to Celtic Woman's new album, Voices of Angels... 

Each Christmas our family draws a name and either buys or makes one gift for that person.
This can be quite difficult for the younger girls, so we give them a hand here and there...{{smiles}}
Last Christmas Miss Rebekah picked Mom's name and so I helped her go about creating something special for Mom.


"Any day spent sewing, is a good day."  ~Author Unknown

Mom loves sewing and has taught many of us the art of needlework already...
We noticed that she didn't have a pretty pincushion and that her pins were bent and quite blunt.
Thus, Rebekah and I decided to sew her a little pin cushion that was both pretty and practical!


"Sewing fills my days, not to mention the living room, bedroom, and closets."  ~Author Unknown

I spent ever so much time perusing Pinterest, eager to find just the right idea...
In the end I came up with something of my own which looks altogether elegant with lace, ribbon and charming floral fabric. ♥


Mom was so delighted with her pincushion that I thought I should make a few more...
One for myself and a couple others for gifts and my little Etsy shoppe.
It is always wonderful creating something sweet and out of the ordinary, don't you think?


Visit my Etsy shoppe to see the pin cushions now available for purchase...and I am offering FREE SHIPPING worldwide for a short period only!


~
Do come by later this week for a delightful little surprise!  {{smiles}}
I would also like to welcome my lovely new readers...it always makes my day to meet a new friend and I hope each lovely visitor will leave feeling warm and blessed!

With love and joy,
Kelly-Anne
 ♥

Tuesday, 13 December 2016

Pretty New Crocheted Earrings in the Shoppe...

 Hello dear readers a happy Tuesday to you!
This morning my dear family and I had a most delightful walk on the beach before coming home to delicious homemade courgette, chive and cheese scones...look out for the recipe coming soon!  {{smiles}}

I have also been restocking my little Etsy shoppe with these charming vintage style crocheted earrings...

These earrings were designed and crocheted by my incredibly creative sister...I have a few in my own wardrobe and simply love wearing a pair whenever I have a chance!  {{smiles}}


And remember that I am offering FREE SHIPPING worldwide for the duration of the Festive season!

~
I have also happily been creating some new lovelies lately...and I am also hoping to restock my shoppe with some handmade cards and tags as well as bookmarks very soon! 

In the meantime, you have a truly wonderful week further, sweet friends, and enjoy this blissful Christmas season!  
We will be putting our Christmas tree up tomorrow and decorating it whilst sipping coffee and eating homemade Christmas fruit mince pies, my favourite!

Blessings and love,
Kelly-Anne

Sunday, 7 August 2016

Beautiful Fabric Bookmarks ~ A Tutorial

A warm welcome to you, dear friends and happy Monday...
How would you like to join me for a lovely sewing session on this crisp August afternoon?


Let us sort through our favourite fabric scraps and look through our lovely lace and ribbon offcuts in preparation for today's delightful tutorial...  Oh, and don't forget the buttons, for buttons are a must in any crafty project, wouldn't you agree...?

Today I am sharing a new favourite make of mine...beautiful fabric bookmarks!  
I saw a sweet idea for sewn bookmarks whilst perusing Pinterest the other day and decided to make my own, adding a few personal touches, of course...{{Smiles}}


I do hope you'll be inspired to make a couple for yourself or someone special...
I must say, I am quite addicted to sewing these lovelies!  

  ~
Let us begin by selecting our desired fabric...perhaps you'd like to make a matching set of bookmarks in which case you could coordinate the fabrics...
Or simply make a couple different ones to put away for gifts...they're bound to come in handy sometime...{{smiles}}
 

Once you've chosen your fabric, decide which lace you would like to use...I found that broader lace created quite a charming effect...  
Now select a matching ribbon...something intricate and pretty is always a good idea!  {{smiles}}
You could choose a button at this stage too or leave it for later on...don't lose it in amongst all your bits and pieces...


Now you can bring out your oh-so-handy self-healing cutting mat, ruler and rotary cutter.  
These three tools I could not live without, my friends...   
However, if you are like my dear mom who prefers being old fashioned by using scissors, you can make a simple template for easy, accurate cutting.  {{Smiles}}


Cut two pieces of fabric measuring 2.75" x 7.5".  
Try to include the prettiest part of the design on the material. 
{I always use 100% cotton fabric...I love the quality and of course the designs are stunning...}

Now cut a piece of thin batting the same size as your fabric.
Lay these pieces aside and trim your lace and ribbon to slightly bigger than the width of the fabric.  Cut another piece of ribbon...preferably a narrower satin ribbon, to 3".


With your ruler and a pen, mark where you will stitch your lace and ribbon on the piece of fabric that is going to be the front of your bookmark.  
I like my ribbon to overlap the lace but this is optional.  
Play around with how low down you would like your lace and ribbon before pinning in place.... 
Now fold your narrow top ribbon in half and pin to the top centre of the bookmark.


Stitch ribbon with matching coloured cotton on your sewing machine.  
The nice thing about overlapping the lace with the ribbon is that you only have to sew two rows of stitches as pictured.  
Baste the narrow ribbon in place so it doesn't move when sewing the bookmark up.


Put bookmark pieces together, right sides facing.  
Place the batting at the bottom as shown - you want to sew on the actual fabric not on the batting as it moves whilst on the machine.  


Sew around the whole bookmark leaving a 1" opening at the bottom to turn it right way around.  
I used a 1/4" seam allowance....


Now trim the excess batting as close to the seam as possible, being careful to not snip the stitching in doing so.  
This stops the batting from bunching when the bookmark is turned the right way around.

Turn the bookmark right way around using e a knitting needle or a blunt pair of scissors to open the corners....


Press with an iron, being careful that it is not too hot otherwise the batting shrinks and causes the fabric to pucker slightly.  
Now, using mattress stitch, neatly hand sew the opening closed.


Topstitch all the way around the bookmark.  
I used a very small seam allowance and first pinned all the way around the bookmark to prevent the fabric from moving about when being sewn.   Use a contrasting or matching cotton.
Secure the button to just below the top ribbon or lower down if you prefer.


And...you are finished!  
What a lovely gift for someone who loves to read and appreciates beautiful, handmade items...  {{smiles}}

~
I have been adding a couple bookmarks to my Etsy shoppe lately...oh, what fun they are to make!
And...now for some happy news....there will be free shipping on selected Heart❤made items for this week only!

Visit Heart❤made on Etsy HERE.


 ~
Happy sewing, sweet readers!

"Think of all the beauty still left in the world and be happy..."
~ Anne Frank

~

Today I am sharing this sewing project with...

Saturday, 23 July 2016

Reflections on Heartmade ~ the Past Two Years

Despite having a couple sick little ones in the house this week past, I somehow found time to complete a fair amount of the sewing I had planned for this week...{{happy sigh}}
As my next order should only coming in at the end of July and having completed the previous one on Monday, I now have a slight break, giving me time to restock my market stall.
This week marks Heartmade's second anniversary...time has just flown since we began trading at our local craft market and it is wonderful to look back at where we have come from, think of all we have learnt and achieved and plan for the future!
 Thankfully, the Lord holds our future in the palm of His hand, so we simply need trust Him and follow His leading.

I thought I would take a few moments to share about the market we trade at...  {To see my post, Following His Leading and How Heartmade Began, stop by my previous blog here.}
We started off in July 2014 in a temporary spot on the deck of the building (most stall holders have their spots on the sand surrounding the actual market building).
We were there for a few months before moving down onto the sand area...  This was quite challenging as our items are delicate and fade quickly....and can I just mention that a South African summer and a few dusty breezes is not ideal!
From there we moved to another spot on the sand area and for some reason, our sales went down considerably.  This was demoralising at first, but the Lord used this time to teach us patience and how important waiting on Him is...  He also showed us that even though we were there to sell, that was not the only reason - we were, and are, there to shine for Him.  This should be our main focus and since then we have really sought Him and not allowed ourselves to become frustrated, tempting as it may be at times.
After much prayer and a little over a year of waiting, the Lord opened doors for us to move our stall onto the deck again, only this time in a new area on the other side.  
Why we were given this spot, being new to the market still and not having the biggest stall, I don't know...but what I do know is that I serve a loving and gracious King who hears prayers!  
And so we have a permanent spot that is both shaded and away from all the sand and dust.  
Also, it is more contained and so easier to set up our table each week.

Even though we have days when sales are not as we would have liked, we choose to give glory to Jesus for all He has done and is continuing to do in our lives and in the lives of others through Heartmade.  
He has given us the opportunity to speak volumes into the lives of others who are very far away from Christ, simply by being at the market each week..  We have formed friendships with most of the stallholders and although they do not know Christ {yet!}, we hope that by being who we are in Jesus will bless and inspire them to question how they are living out their lives.  

Thus, Heartmade is not just about our quality handmade items, it is about spreading love and light through what we are blessed to do and through being open vessels for the sake of the Gospel!  Sometimes we become frustrated, but God continues to shine forth His might and through the market I have gained a couple good clients for which I am very thankful!
And...I get to do what I truly love to do in my own time...and I am at home...it surely does not get much better than that! 

Now let me show you a couple of the items I have been working on this week including something new...{{Smiles}}

Meet this sweet new bunny which I made for a client of mine...she sent me a picture of what she had in mind and I tweaked things from there and used beautiful pink 100% cotton fabric and added a pink ribbon to finish it off...
Here is another I made, only this time I used a beige print with a leafy design...this is a more neutral coloured rabbit...I think he is my favourite of the two!  {{smiles}}
Of course I made another one or two for my market stall as well because oh!  They are just too sweet...


It was lovely to play with beautiful fabrics for my actual stall this week...althugh I do enjoy creating orders as well!  But my stall has been looking somewhat sad and neglected of late....  The busy season is approaching, so I need to keep on top of things a bit more...

Here is a red and beige floral mini bunting I made and I think I may just keep it...it doesn't work with the colour scheme of my bedroom, though, so I suppose it can bless another...:)
I am enjoying making my patchwork hearts at the moment.  If you remember from last week, I hosted a sewing workshop for girls and we made these hearts....only they did theirs by hand and only worked a heart cross stitch motif as all of them were new to the concept.  


I also prepared two more reindeers to sew whilst sitting at the market on Saturday...I find it is a great time to work on things I don't normally enjoy doing at home...  The sewing on of the paw pads take a while as they're handstitched and the stuffing is easy to do while I keep an eye on my stall and chat to passers by.  
Hopefully I will have these lovelies finished very soon...and I may even add them to my Etsy shoppe, so stay posted!  {{Smiles}}  The reindeer are my top sellers in late November, early December and so far my stock of them consists of three with these two...best I get to work!  {{Smiles}}


A turqouise ellie softie and a pink patchwork baby taggy ball were another two items I had fun making this week...I try to keep a good stock of every item, usually about half a dozen of each, maybe more depending on their size and how popular they are.
The ellies are definitely my best seller by far, more than likely because we live in the Knsyna area where there are forests and elephants have been spotted...
Tourists love anything to do with elephants and these are sweet gifts to take home to babies and toddlers...or even young children!
 
  This pink taggy ball is now available in my Etsy shoppe over HERE...

 
This sweet beige bunny with a red and white striped bow is now available in my Etsy shoppe!  You can visit the listing over HERE...

~
And I simply couldn't resist sharing yet another photograph of this precious boy!  
Ah, Caleb is growing like a weed and has started grabbing things with his chubby little hands...when I am talking to him and giving him kisses, he puts both his wee hands on my face as if to draw me closer...now that is enough to melt any heart!  
Caleb is now 12 weeks and continues to be a blessing and a joy around our home!  
On this particular day Mom was hanging the washing and put Caleb outside on a blanket to look at the world around him...he enjoyed this so much! 
~
I would love to know what you has been happening in your crafting room, my friends.  
It is always inspiring to hear of what others are making, so I invite you to share your creativity with me!  {{smiles}}

~
My country diary has been quite happy this week...in case you missed Tuesday's post, What Being Happy Means to Me, stop by here.  And I know this week's Thursday Pearls will lighten your heart as well...do take a moment to read these pearls of wisdom and may your heart be blessed!

I pray each of you will be blessed with a wonderful Lord's Day tomorrow!

With love,
Kelly-Anne